I’m going to go ahead and say this right off the bat: I’m a Visio junkie.
Visio is not technically a network management tool, but in my opinion it deserves a place in every administrator’s toolbox. Trust me on this – nothing makes you look less professional than sharing a diagram created on the back of a scrap piece of paper – or worse, MS Paint.
However there can be an art to using tools like Visio. Here are a few simple tips to help you create quality, professional-looking network diagrams.
Use Multiple Pages
The number one mistake in many network diagrams is an attempt to convey too much information on one page. Visio allows use of multiple pages just like an Excel workbook with many worksheets, so consider using multiple drawing sheets for different purposes. For instance, you might show your Layer 2 wiring on one page, WAN and core on another page, and your VLAN scheme on a third. You could also add pages for things like your datacenter and internet connections. Keep it simple, but use as much space as is necessary.
Make Use of Border Templates
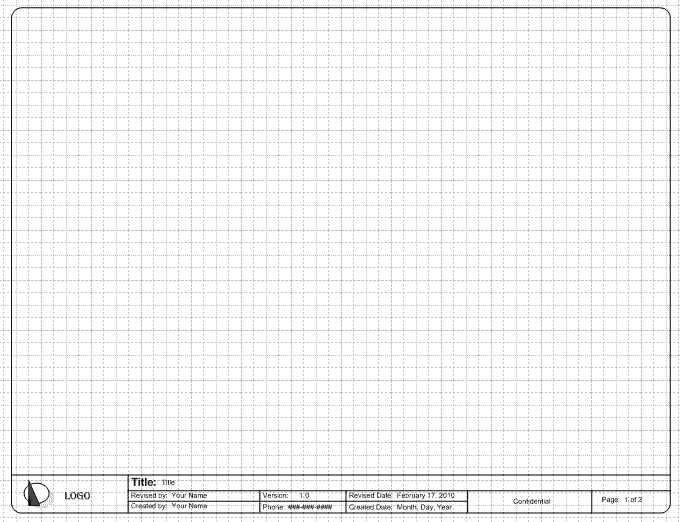
A border template can make your life a little easier by providing a way to track changes to your diagrams. In your template include sections for author name, version number, date, page number, and any other fields that will be useful. Most of the fields can automatically update themselves – more information on that can be found on the Microsoft website here.
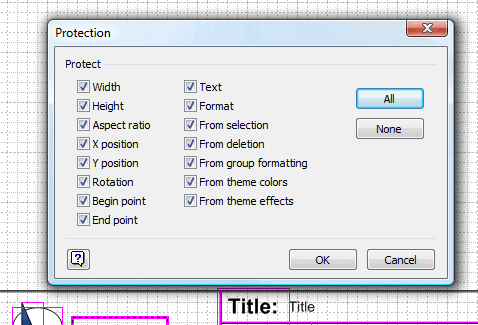
Borders can be locked to the page so that they aren’t accidentally moved around later. Just select all the shapes that make up your border by holding down the CTRL key and clicking on each of the lines, boxes, or text that make up your border. Next, right-click on the shapes and select Format, then Protection. This will bring up a box that allows you to select which shape properties you want to select. Select everything that applies, then click OK. Remember to leave text fields unlocked if you want to modify them later.
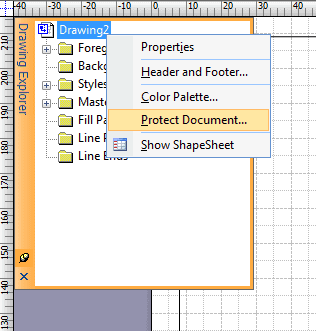
Shapes can still be selected, so to prevent shape selection and make your border a little more foolproof you need to protect the drawing. Click on View, then Drawing Explorer. Right click on the drawing, which will appear at the top of the Drawing Explorer window, then choose “Protect Document”, and check the Shapes box. Your border is now locked to the page and can’t be changed or deleted by accident.
Now save your file as a Visio Template (.VST) into your templates folder, and you can use this every time you create a new document for a consistent look.
Cut the Clutter
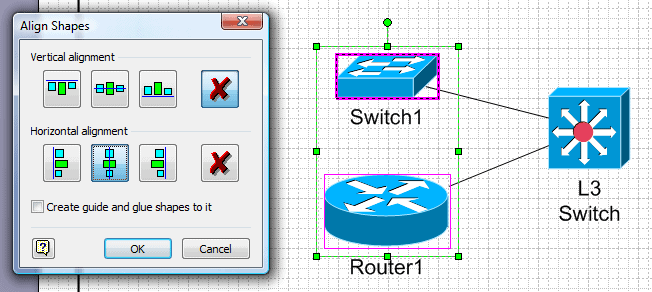
Visio provides some useful tools to help de-clutter and organize your diagrams. Shapes usually look best when they are aligned with one another. To have Visio do this automatically, select the shapes you want to align, then click the Shapes menu, and choose Align Shapes.
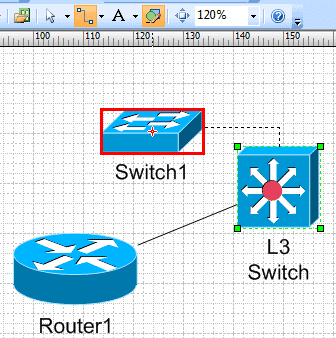
Dynamic connectors are another great way to keep your diagrams clean. Dynamic connectors will automatically snap to your shapes, and stay connected when you move shapes around – saving you work when you need to modify your diagrams later. To use them, pick the dynamic connector tool. Hover your cursor over the shape you want to “lock on.” Visio will show a red target box around that shape. Click and drag a line to the next shape you want to link to. The shapes are now linked, and can be moved around without losing the line between them.
Dynamic connectors can be changed to use straight or even curved lines by right clicking on the connector and adjusting its properties.
Customize It With Stencils
Visio includes basic stencils for things like routers, switches and servers – but you’re not limited to those shapes. Most hardware vendors also provide their own Visio stencils that can give your diagrams a custom look and variety. My personal preference is the standard Cisco shapes that I’ve used above. But, everyone from HP to IBM and Brocade provides their own stencils. To use them, just download the shapes and place the .VSS file into your shapes folder. Then, open the shape-sheet from the File menu.
Automate Network Diagramming
Tools like SolarWinds LANSurveyor (Read my LANSurveyor 10 Review) can make your job of creating documentation much easier. Just fire up the software, let it query the network, and the tool does all the hard work of creating your maps. When it’s done you can tweak it for visual effects, then export to Visio for distribution with your team.
Share It
Starting with Visio 2007, the ability to save Visio files as PDFs is included. Saving as a PDF is a great way to share diagrams with other groups like your helpdesk or clients, while still keeping version control over the original documents. Have information that you don’t want to distribute widely? Custom shape properties can store information with the diagram, but won’t appear in the PDF copy. This is perfect for uploading to an internal Sharepoint server if you have a large support team.
With all of these features, Visio really makes it easy to create high-quality network diagrams that you won’t be afraid to share.
Microsoft Visio FAQs
What are some best practices for creating professional network diagrams?
Best practices for creating professional network diagrams include using clear and consistent labeling and annotation, organizing elements and components logically, using appropriate colors and icons, and keeping the diagram simple and easy to understand.
How can you customize and format elements in a Visio network diagram?
You can customize and format elements in a Visio network diagram by changing their size, shape, color, and other properties, and by grouping and aligning elements as needed.
How can you add data and information to a Visio network diagram?
You can add data and information to a Visio network diagram by using data graphics and linking to external data sources, such as spreadsheets or databases.
Can Visio network diagrams be shared and collaborated on?
Yes, Visio network diagrams can be shared and collaborated on through a variety of methods, such as sharing files through cloud storage or collaborating in real-time through Office 365.
What are some common mistakes to avoid when creating network diagrams in Visio?
Common mistakes to avoid when creating network diagrams in Visio include overcrowding the diagram with too much information, using inconsistent or confusing labels and annotations, and failing to properly organize and group elements and components.
How can you use Visio to create network documentation?
You can use Visio to create network documentation by creating diagrams and adding detailed notes and descriptions, and by using data graphics and other tools to present information in a clear and organized manner.
Can Visio be integrated with other network management tools?
Yes, Visio can be integrated with other network management tools, such as network monitoring and management tools, to provide a comprehensive view of network performance and status.

